Showing posts with label Organizing Collections. Show all posts

Master Closet Reorganization

MASTER CLOSET REORGANIZATION
COST: 6 hours labor, broken up into two days PLUS 0.00 for supplies 

Sometimes an attempt to organize ends up with too many organizational tools for the space- a shelf unit, a valet chair, and a plastic drawer set.  For this master closet, floor space had been lost and surfaces were created which resulted in dumping clothes, rather than putting up clothes.  In addition the shelf, valet chair, and plastic drawers had resulted in adding more clutter.  What began with the best of intentions ended up creating more problems.

If an organization project does not include an attempt to change or modify behavior, as well as accounting for patterns of behavior, then it will not be completely successful.

This master closet measures 5'4" wide by 12' long, over 60 square feet total.  The walls are over 9 feet high. The door opens against a wall with only 4 inches behind it.


A wall of wire shelving lines the right wall.

On the back wall is a deep shelf unit covered in purses, scarves and canes.  The shelves are too deep and too tall.  Lining the top are shoe boxes containing more scarves, billfolds and other things. The left wall is covered with hats, jewelry, purses, and shoes, double stacked.

In the foreground draped by a black and white floral scarf is a 2 drawer shelf unit which has become a dumping ground for anything and everything.

A black basket filled with paperwork, etc, belongs in the home office. Behind it, nestled next to the deep shelves, is a CPU and travel bags.
  

The closet door opens in.  There is a mirror on the door.  Behind the door there is just enough space for  a tie rack.
Purses are double hung. Jewelry is tacked to the wall and hung on a valet chair.  The two drawer set, covered by the black and white fabric, holds "long term" storage. It's easier to toss clothes on these surfaces than put them away.
Shoes are doubled up or stuffed under hanging clothes, out of sight.  Purses and scarves are in a jumble. The shelves beyond hold seasonal clothes or seldom worn clothes. It's time to weed out some things and organize the rest.

CLEANING GOALS:
Make room to walk.
Make purses accessible.
Get the shoes in one spot, in view.  Give each pair a space.
Toss some clothes.
Make a place for jewelry, hats and scarves.
Get junk out of the closet that doesn't belong there.
Accommodate the travel bags.

SYSTEM /BEHAVIOR GOALS
Create a seasonal swap out system.
Work around the "work clothes" toss.  Create a spot where around-the-house clothes can be placed.
Make a space for everything so that it's easy to put everything where it belongs.
Save money. Reuse and repurpose. Use what's on hand.

THE TASK
In order to make room to walk, the deep shelf unit, the valet chair, and the two drawer set were removed.
It was decided that the wire shelves on the right wall would remain in place. If it works, don't fix it.

Vacuum, vacuum, vacuum- the corners, the baseboards, the cobwebbed heights, the carpet, everything. And then vacuum again. The vacuum cylinder was cleaned out twice.  It's unbelievable how much dust, fibers, hair, etc. accumulates in closets.

Starting simply, the space behind the door was tackled.  Limited in depth, the tie rack would remain but would be moved lower.  An old cork board was brought out of storage and used to organize jewelry. Cup hooks would have worked nicely, but were unavailable. Picture nails were on hand. Staring with the largest and longest pieces, things were added to the board.  The advantage of a board is no more tangled necklaces.  It's also easy to see what you own. Nicer jewelry was stored in a jewelry box elsewhere.
 
A few pictures and postcards fill in the unused space.
Scarves were weeded through. 
The remining scarves were hung in row beside the jewelry board.

Because the shoes had taken up so much of the floor space, their placement was tackled next.  Using shelves and brackets on hand, the far corner opposite the door was chosen. Over thirty pairs of shoes were kept.  It was the shelf size that determined how the layout would work. 

These shelves are the basis for a permanent setup later when expenses allow some changes; but the layout will remain the same. 

When organizing shoes, first separate each person's shoes. Beginning with the largest, such as hiking boots or work boots, determine where the first layer will sit.  The height of the shelf above will be based on the tallest pair. Flat, low sandals were placed together on one shelf to save wall space. Similar styles and colors were placed together. High heels together. Tennis shoes together, etc. It's okay to keep shoes in boxes if you know what's inside.

Next, the collection of three dozen purses was tackled.  It was decided that everything would be kept.  The other big collection were the hats.  In the end, it just seemed easier to keep the hats and hat racks where they were.  So the purses were worked in under the hats.

When tackling the purses, it became apparent that there were mostly black and brown purses, then numerous assorted  colors. These were grouped first into black purses and brown purses. The largest were placed first at the lower parts and gradually smaller purses above. Of the colored purses, cloth bags were grouped and stiff ones together. To help purses keep their shapes, stuff with newspaper or cut-to-shape cardboard. Keep them zipped.  

For this homeowner, using different purses regularly meant creating a way to make it easier. An empty letter tray is used to store purse contents.  When returning home, the purse is emptied into the tray and then hung up.  This makes it easier to deal with receipts, replace used items such as tissue and meds, and gather loose change.  When choosing an outfit the next time, a purse is selected and filled.

 
So many purses!
 
No more double stacked purses.  Easy to get to. Easy to see. Each purse has its own hook.

MONEY SAVING TIP
Three inch screws are cheaper than 36 purse hooks. The screws are long enough to seat easily into a wall and adjustable according to the strap width.  After screwing it in, slip a pencil grip over the exposed screw area where the purse handle will hang. Cheap and easy to cut to size, pencil grips protect the handle and are a great money saver. 

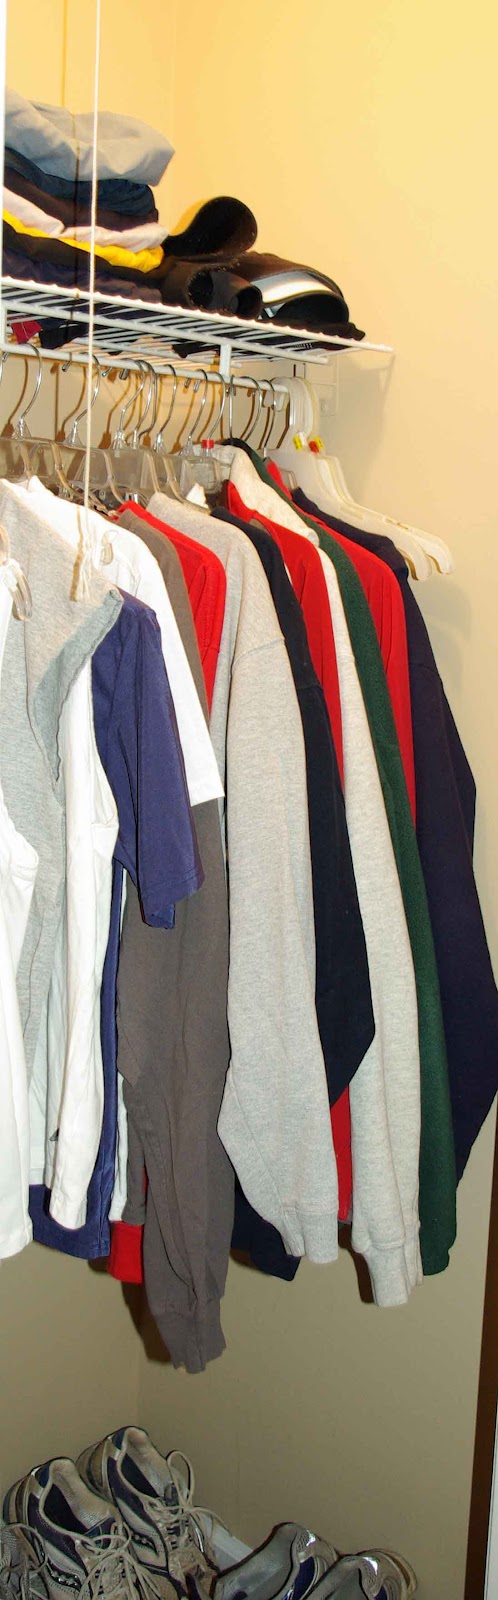
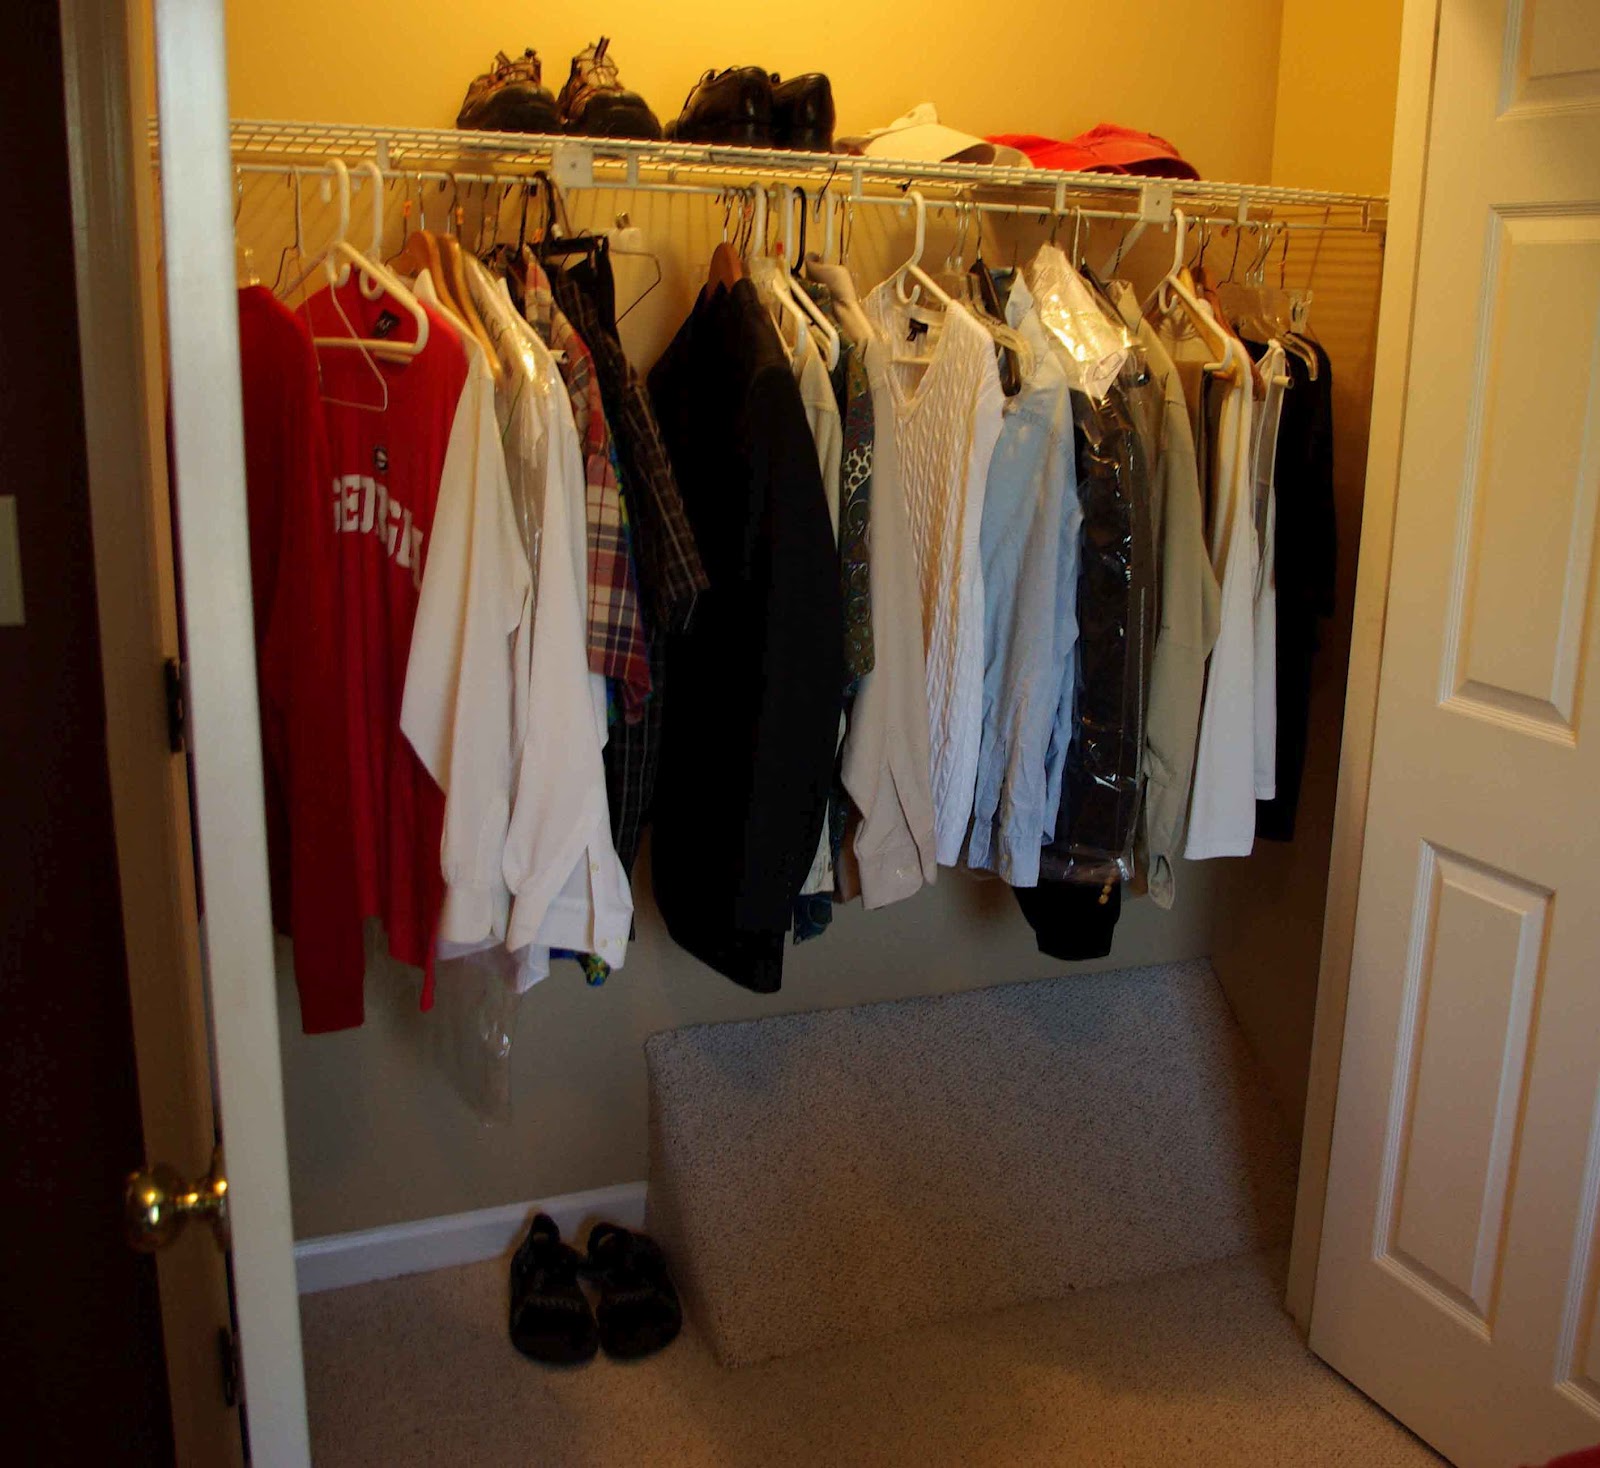
The next step was the wall of wire shelves. The shelves remained in place. 

 
The shelves closest to the door are in season and most commonly worn.
They will be rotated out with what's on the long high shelf above, which holds out-of-season clothes.
A housecoat hangs on a convenient hook.

Wire shelves are great for forcing yourself to limit what goes in the closet.  If you use the separate spaces between wires, you can limit yourself to one hanger per space, leading to less clutter.  It means you'll have to bump what you store on the shelf back an inch or two, but it's worth the trouble for some people.

For the husband in this home, it's different. Taking behavior into account and using what is on hand, the far bottom rack of clothes is on a single closet rod.  These clothes are what the husband uses now, this season.  He hates the separate slot arrangement because he likes to flip through the shirts quickly, pushing clothes out of his way.  Above it are out-of-season clothes separated into the slots.  Seasons change and the clothes will be switched out.  
REMEMBER: When changing clothes out seasonally, take time to vacuum these hard to reach spots.

Originally it was thought that the space without a low hanging rack would be extended.  As clothes were tossed out, it was determined that there was enough hanging space. Several long dresses had to be accommodated and more importantly, those troublesome "house clothes" had to have a space.  Before reorganization, the house clothes were tossed on any surface.  So without a hanger as an option -old dogs, new tricks...-something else had to be devised.

Using what was on hand, three milk crates and a basket hold work-around-the-house clothes and house slippers.

Up top, the high shelves were put to better use.

Travels bags were stored inside a larger bag.  Extra hangers were hung. Boxes were stored at the 9 foot level. As for all those clothes on the deep shelf unit, some were tossed, some incorporated into current use areas, some were put up for seasonal storage on the second highest shelf.


At last! Room to walk.  A place for everything and everything in its place.

FINISHED

CLEANING GOALS:
Make room to walk. -YES
Make purses accessible.- YES
Get the shoes in one spot, in view.  Give each pair a space. -YES
Toss some clothes. -YES
Make a place for jewelry, hats and scarves. - YES
Get junk out of the closet that doesn't belong there. -YES
Accommodate the travel bags. -YES

SYSTEM /BEHAVIOR GOALS
Create a seasonal swap out system. - DONE
Work around the "work clothes" toss.  Create a spot where around-the-house clothes can be placed. -DONE and happy to report it works!
Make a space for everything so that it's easy to put everything where it belongs. -DONE
Save money. Reuse and repurpose. Use what's on hand.- SUCCESS

FINAL THOUGHTS
No money was spent because we repurposed some things: milk crates, old shelving and brackets, a basket, a cork board, screws, pencil, grips...
The shoe shelves are laid out but incomplete, awaiting either money or inspiration on how to repurpose something else.  Sometimes temporary solutions are best for a large project.  If you wait until there's enough money for that fancy organization system, you may never start.  If the mood strikes, do it in part or in whole. Be willing to change your mind as you go.  After clearing out and cleaning up, you may not need everything you thought you would.
This project took two days.   Reaching overhead, stooping, lifting, and climbing up and down will take its toll.  Plan accordingly.

UPDATE:
The shoe rack was completed after the reorganization. Built to fit into the space we had created, it was inexpensive but very functional: $8 in lumber plus use of existing shelves.


7 Closets In 5 Hours

One year after moving in, there were unpacked boxes of clothes 
stored in the study, and the homeowner's closets were underused. 
We emptied the boxes and tackled 7 closets in 5 hours, clearing his study.

COST: 5 Hours Labor + One Shelf Bracket for a sagging closet corner

This homeowner has more clothes than the before pictures reveal, a LOT more!  Living alone, he is lucky to have all the closet space to himself.  In the end, we created closets dedicated to types of clothes: Casual, Formal, Dress Casual, Out-of-Season, Long-term Storage, and Sports Wear.  As an avid runner, he also had to make room for golf ensembles, ski wear, swimwear, football game attire (GA DAWGS, of course), and rugged outer wear that included cowboy boots and flannel shirts.  Travel luggage had to be worked in. Shoes were separated into different closets according to the occasion. A coat closet downstairs at the entrance filled up quickly.  The linen closet was the only closet that remained half filled. A hat collection found a home. In addition to 7 organized closets, the study was finally cleared and turned into a working study for the homeowner.
CLOSET ONE
The first closet is in the master suite. It is one of two closets which line a hall connecting the master bedroom to the master bathroom. Across the hall is a walk in closet.  This closet has folding doors.

BEFORE

AFTER

This closet houses the nicer casual shirts. Golf Shirts hang at the left. Short sleeve button downs are in the middle with long sleeve button downs at the right. Solid blue and white long sleeve button downs are across the hall in the walk in closet with the suits.


The top shelf has a fabric steamer and three boxes of ties.
RECOMMENDATION:
Now that the closets are organized, it's time for the ties. Working around the space used, we're left with the insides of the doors in the guest room and the office for the ties. Ties racks hung on the inside of these large doors will work great.

The nicer shoes are in this closet because that's where the room is.

CLOSET TWO
The second closet, a walk-in, is across the hall in the master suite. It had became a place to drop laundry. Sports wear and formal wear hung alongside casual wear.

BEFORE

AFTER
 
This became the formal wear closet. 
The awkward L shape and shelves that overlapped layers was worked around.
On the top are the suit jackets. One the bottom are slacks and very nice shorts (golf wear, etc). The areas where shelves overlapped provide storage for extra hangers. On the far right top shelf, there are small boxes for bow ties and silk handkerchiefs. A very nice suit coat for tuxedo and black tie occasions hangs at the extreme right near the formal wear. The length of the coat and the limited use with formal wear dictated that it was placed in the corner of the formal wear closet.


The shoe boxes at top left are empty. Shoe boxes always come in handy; keep a few if you've got the room. 

CLOSET THREE
An avid runner, the hall closet was turned into a sports closet.

BEFORE


The closet went from housing military uniforms to athletic wear. 
Now retired, uniforms went into the attic for permanent storage.

AFTER


The sports closet
The top shelf holds shorts and running braces on the far right. Hanging from L-R are Long pants, shirts, and then jackets to the right.
The laundry basket works well for him. Tossing in a lightly soiled set of running togs for a second or third run, the basket is the perfect drop spot. This is an example of a habit that works. Previously, he kept the basket in another closet next to regular clothes. In creating a sports closet, the basket became our starting point.

The oodles of shoes must be better controlled. 

RECOMMENDATIONS:
Our goal was to work with what we had. However, in the near future a set of plastic drawers with 2 DEEP drawers should be placed on the floor to the right of the laundry basket. The shorts from the top shelf should be moved into the new drawers and the majority of shoes should be put on the top shelf. (First, line the shelf. Cardboard will do fine.) The shorts folded on the top shelf won't stay neat for long. Drawers that thin running shorts will be tossed into are ideal. Keep 2 pairs (max.) of shoes in the floor with shoe inserts. 

TIP: For shoes that are seldom worn, stuff newspaper inside. It works in so many ways. The paper helps the shoes retain their shape, and it absorbs dampness and odors. No cobwebs either!

CLOSET FOUR

BEFORE

The study closet, like the other closets, was underutilized.  The study was unusable because boxes of clothes, pictures, luggage, and desk parts crowded the room. We had to clear the room to fill the closets and set up a study.

AFTER

This is what he calls his primary overflow closet. It's mostly for casual wear.


When the client said he loved t-shirts he wasn't kidding. To the far left are events shirts from road races, distinguished by hanging on plastic hangers. The bulk of the shirts hanging are his usual t-shirts. The belt loop with 30+ belts works for him so it's hanging next to casual pants. 

The top shelf came in handy because he had little drawer space : one dresser with 5 drawers. Bulky jeans are folded and placed in two stacks to the left. The middle stack are work pants for painting and working around the house. The two stacks at the far right are "too small" shorts waiting for the day those few inches disappear and then the shorts will move into the limited drawer space.


The stairs angle beneath the closet so there's a strange little bump in the closet floor.
IDEA: Rest shoes at an angle.
The storage bins on the floor also contain t-shirts. He doesn't wear them, but doesn't want to part with them. 
To the left of the storage bins, extra pictures are stored. Out of sight, they are safe from breakage.


At Last! The room is transformed into a working office.

CLOSET FIVE

The guest room has a large closet, but if you're a guest, don't expect to share closet space.  By now, it's obvious that this homeowner has LOTS of clothes.

BEFORE

There's a hat collection hidden in here!

Cowboy boots, skis boots, sandals and more...

AFTER

What a difference!


The hat collection is now in one closet. We had an overabundance of cup hooks and these worked perfectly. Just the week before he had asked why the previous homeowner needed cup hooks under every kitchen shelf. We found a great use for them.


A small wooden rod rests on the front of the shelf.  This works great to lift the caps from the hooks.

The clothes in this closet are seldom worn or off season.
(ABOVE LEFT) Seldom worn ski wear and boots found a place at the far end of the closet. Turning the boots sideways, we had room for 2 pairs side-by-side, two deep.
(ABOVE RIGHT) A mirror from a recent bathroom remodel no longer had a home, so we put it against the back of the closet wall. Mirrors can be expensive so he wanted to keep it for future remodeling.
This closet became the spot for casual shoes.


CLOSETS SIX AND SEVEN

These two closets took about 5 minutes each.  If it works, don't change it!


BEFORE
Sometimes you don't need a big change. Don't create work.

AFTER


Space was found for a vacuum cleaner. Collapsible travel bags for weekenders were placed on a lower shelf. The larger luggage went into the attic for those once-a-year week long vacations. 


RECOMMENDATION:
In the end, we had a cardboard box of oddballs like socks he didn't want to get rid of. I recommended that he buy a plastic box with lid that will fit on the empty shelf for the odds-and-ends.

THE FINAL CLOSET
We actually redid the coat closet downstairs, but no pictures are available. It was very necessary because the upstairs closets had overcoats and outer jackets mixed in. When we took the outerwear downstairs, we discovered dry cleaning mixed in. We took five minutes to clear out the odds-and-ends which found a home upstairs in one of the other 6 closets. Coats were organized seasonally and gloves and knit caps were stacked on the shelf. It was a quick redo which left no room for future dry cleaning.
Only one coat remains upstairs. Worn only for black tie winter occasions, it made more sense for the long, wool, formal coat to stay in the formal wear closet.


LESSONS LEARNED


Work with the client. 
Initially he wanted me to come in while he was working. This doesn't work with a space as personal as a closet. I found out just how often he does wear all those t-shirts and that he loves his collection of hats. I also discovered how committed he is to running and a dedicated sports closet is the end result. I also discovered the (in)frequency that he uses things from ski wear to flannel wear.

Work with what the client has.
Dry cleaning hangers. He uses dry cleaners more than most so I used his dry cleaning hangers for the things that get dry cleaned. All button downs went on metal because, let's face it, when's the last time you switched hangers after picking up your dry cleaning? 


Sometimes swapping all your hangers helps to create a neat, uniform appearance.  We opted to use what we had on hand. As inexpensive as hangers can be, this homeowner had a surplus of unused hangers. More importantly, he uses dry cleaners a lot, and it's easier for the clothes to stay on the D/C metal hangers. It wouldn't make sense to swap out hangers unnecessarily.

We sorted the plastic hangers, the clip hangers, the pants hangers, and the wooden hangers from the metal and used them appropriately. His golf shirts got the plastic hangers because they go in the washer and weigh more than a tee. T-Shirts got metal hangers because they are light weight and we had a million of them, t-shirts and metal hangers. Suits got heavy duty hangers. Pants were hung on a mix of D/C hangers with cardboard overlay, heavy plastic pants hangers, and clip hangers. Wooden hangers were used in the downstairs coat closet. Extra hangers went in every closet afterwards. Excess hangers were hung from the bottom shelf in the linen closet. As D/C metal hangers accumulate, return the excess to the dry cleaner or donate them to a thrift store.

Don't create work where none is necessary.
The closet shelves stayed where they were hung. 

The laundry closet was functional and organized; we only utilized the free space that was already there.

Buy only what you need up front.
In all, he bought one closet bracket because he saw the guest room closet wasn't braced at one end. 

Buy what you think would improve the situation after you know what the situation is.
In the end, I had two BUY recommendations. 

(1) a covered plastic box for odd-and-ends for the linen closet
(2) a set of deep drawers to store running shorts in the athletic use closet. It will be much easier to toss running shorts into plastic drawers than keep them folded on the shelf.
We discovered a need for these things after the organization was finished.